The Ultimate Guide on How to Grow Hydrangeas from Cuttings in Water: Step-by-Step Tips for Success

Hydrangeas are a favorite among gardeners for their stunning blooms and lush foliage. Propagating these beautiful plants from cuttings can seem daunting, but growing hydrangeas in water is a straightforward and rewarding process. This ultimate guide will walk you through each step of successfully rooting hydrangea cuttings, from selecting the right stems to ensuring they thrive in their new environment. With our expert tips and detailed instructions, you’ll gain the confidence needed to expand your garden and create a vibrant display of hydrangeas. Dive in and discover how to nurture your cuttings into flourishing plants with ease!
How to Successfully Propagate Hydrangeas from Cuttings in Water
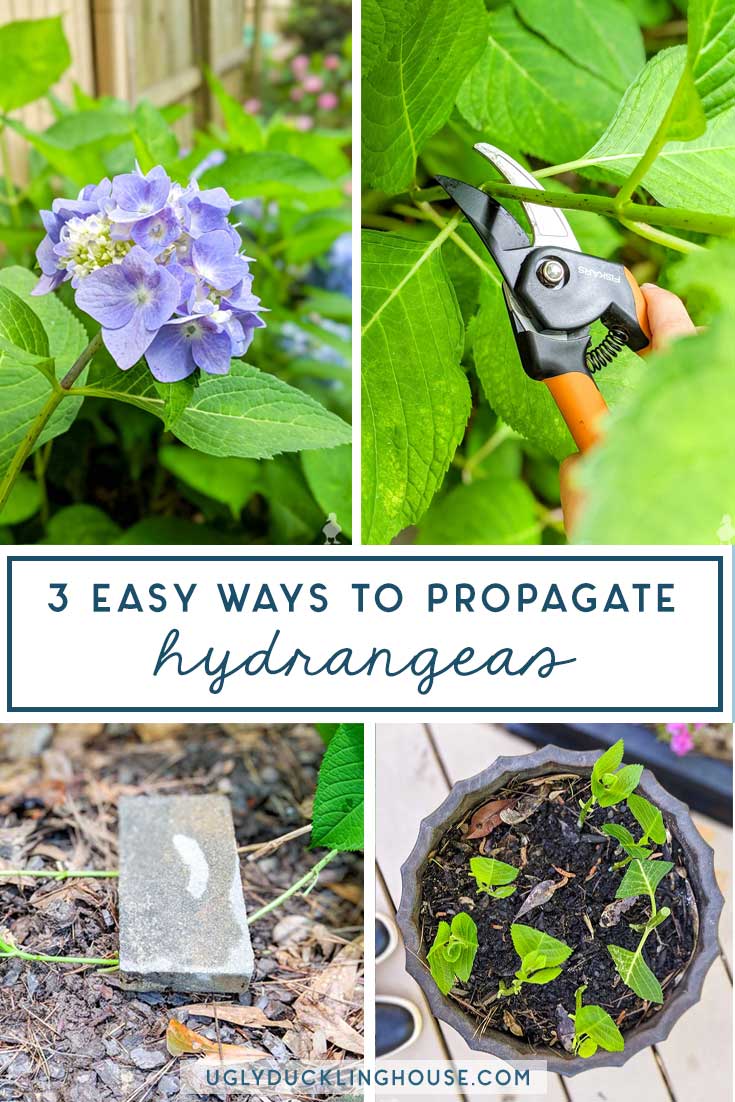
To grow hydrangeas from cuttings in water, start by selecting a healthy stem from an established plant, ideally during the late spring or early summer when new growth is abundant. Cut a 6 to 8-inch piece just below a leaf node, removing the lower leaves while leaving a few sets intact at the top. Place the cutting in a container filled with clean water, ensuring the node is submerged, and the leaves remain above the waterline. Position the container in a location with indirect sunlight and wait for roots to form over the next few weeks, refreshing the water weekly. Once the roots reach about 2 to 3 inches, you can transition the cutting to soil to continue growing.
Choosing the Right Hydrangea Cutting
When selecting a cutting, it is important to choose a healthy, non-flowering stem from a mature hydrangea plant. The best time to take cuttings is during the growing season, preferably in early summer, when the stems are still somewhat soft. Avoid taking cuttings from old, woody stems or those that appear damaged or diseased. The quality of your cutting will significantly influence the success of propagation.
Preparing the Cutting for Water Propagation
To prepare the cutting, use sterile pruning shears to make a clean cut just below a leaf node, which is essential for root development. Remove any lower leaves to reduce water loss and prevent rotting in the water. If desired, you can dip the cut end in rooting hormone, although it's not necessary when propagating in water. Proper preparation helps ensure your cutting remains healthy while it roots.
Water Conditions and Maintenance
The water in which you place the cuttings should be fresh and ideally distilled or filtered to eliminate impurities. Change the water every week, ensuring that the cutting's node remains submerged and free from any debris. Placing the container in a bright spot with indirect sunlight will create ideal conditions for root development, but avoid direct sunlight, which can heat the water too much and harm the cutting.
Monitoring Root Development
Root development typically takes a few weeks; during this time, it's crucial to monitor the cutting for signs of growth. Look for small white roots emerging from the submerged node. This is an indication that your cutting is ready for transplanting. Patience is important, as some cuttings may take longer than others to develop adequate roots.
Transplanting to Soil
Once the roots are about 2 to 3 inches long, carefully remove the cutting from the water and transplant it into a potting mix that is well-draining. Make a small hole in the soil to accommodate the roots without bending them, and gently firm the soil around the base of the cutting. Water the newly transplanted cutting well, and keep it in a warm spot with indirect sunlight to facilitate healthy growth and acclimatization to its new environment.
| Key Steps | Description |
|---|---|
| Selecting Cutting | Choose a healthy stem from a mature plant, ideally in spring or summer. |
| Preparing Cutting | Use sterile shears, make a clean cut, remove lower leaves, optionally use hormone. |
| Water Maintenance | Use fresh water, change weekly, ensure indirect sunlight exposure. |
| Root Monitoring | Look for root growth after a few weeks, indicating readiness for transplanting. |
| Transplanting | Move the cutting into well-draining soil when roots are sufficiently developed. |
What is the fastest way to propagate hydrangeas?

The fastest way to propagate hydrangeas is through cuttings taken from a healthy plant. This method allows you to create new plants that are genetically identical to the parent plant, ensuring that you maintain the desired characteristics such as flower color and growth habit. Here is a step-by-step guide.
Choosing the Right Time
The best time to take cuttings from hydrangeas is during the summer months when the plant is actively growing. This can typically be between late spring to mid-summer. During this period, the stems are firm yet still flexible, making them ideal for rooting.
- Harvest cuttings early in the morning for maximum moisture.
- Look for healthy, strong stems that are around 4-6 inches long.
- Avoid any stems with flowers as they may not root well.
Preparing the Cuttings
After selecting your cuttings, the next step is to prepare them for propagation. You want to ensure that the cuttings are properly trimmed and treated to enhance their chances of rooting.
- Trim the cuttings just below a leaf node to increase rooting potential.
- Remove the lower leaves, leaving only a couple at the top.
- Dip the cut end in rooting hormone to promote root development.
Planting the Cuttings
Once your cuttings have been prepared, it is important to plant them correctly to ensure optimal growth conditions. The right environment will aid in successful rooting.
- Use a well-draining potting mix or a mix of peat and perlite.
- Poke a hole in the medium and insert the cutting, firming the mix around it.
- Water the cuttings lightly to settle the soil and maintain humidity.
Providing Proper Care
Proper care is crucial in the weeks following the planting of your cuttings. This involves maintaining moisture and a healthy environment to promote growth.
- Cover the cuttings with a plastic bag or a propagator dome to maintain humidity.
- Place them in a warm, bright location but avoid direct sunlight.
- Check the soil regularly and mist the cuttings as needed to keep moisture levels consistent.
Transplanting the New Plants
Once your cuttings have developed a strong root system, it’s time to transplant them into larger pots or directly into the garden. This will allow them to grow into healthy, mature hydrangeas.
- Ensure the new planting site has well-draining soil and enough sunlight.
- Carefully remove the cuttings from their initial containers, ensuring not to damage the roots.
- Water thoroughly after transplanting to establish their new growth location.
Can you put hydrangea cuttings straight into the ground?
To successfully put hydrangea cuttings straight into the ground, it is essential to understand their growth requirements and the best practices for propagation. While it is possible to plant hydrangea cuttings directly into the ground, the success rate can vary based on several factors such as the timing, method, and soil conditions. Placing cuttings directly into the soil can sometimes lead to poor rooting if not done correctly, especially without proper preparations.
See also:
Understanding Hydrangea Cuttings
Hydrangea cuttings are typically stem segments taken from a parent plant to cultivate new plants. The two most common types of cuttings are softwood cuttings taken in late spring or early summer and hardwood cuttings taken in late fall or winter. Each type has specific characteristics that influence their compatibility with direct planting.
- Softwood cuttings are tender, green stems that root easily but require more care.
- Hardwood cuttings are more robust and can be more tolerant to direct soil conditions.
- Understanding these differences helps in selecting the right cutting for success.
Ideal Timing for Planting
Timing plays a critical role when putting hydrangea cuttings directly into the ground. The best time for planting cuttings is during the growing season, typically late spring or early summer for softwood cuttings. This period allows the plants to establish roots before the colder months.
- Plant during the morning or late afternoon to minimize stress from the sun.
- Ensure the cuttings are planted after the last frost for better success.
- Regularly monitor weather changes that may affect root establishment.
Soil Conditions for Success
The soil conditions are crucial for the survival of hydrangea cuttings. A well-drained, nutrient-rich soil is ideal for planting. Proper soil will support root growth and reduce the risk of rot.
- Amend the soil with organic matter such as compost to improve fertility.
- Ensure the soil is kept moist but not saturated to prevent waterlogging.
- pH levels should ideally be between 5.5 and 6.5 for optimal growth.
Care After Planting Cuttings
After putting cuttings into the ground, it is essential to provide adequate care to promote successful rooting and growth. This includes regular watering, protection from extreme conditions, and careful monitoring.
- Water the cuttings regularly, ensuring the soil does not dry out completely.
- Apply a mild fertilizer once new growth appears to support development.
- Shield young plants from harsh sunlight and strong winds to prevent stress.
Potential Challenges and Solutions
Planting hydrangea cuttings directly into the ground can present certain challenges, including root rot, poor growth, and environmental stress. Identifying these issues early can help mitigate loss and encourage healthy development.
- Watch for signs of root rot, such as yellowing leaves, and improve drainage if necessary.
- Adjust watering routines based on weather conditions to maintain optimal moisture.
- In the event of environmental stress, consider temporary shade or windbreaks.
Questions from Our Readers
What is the best time to take hydrangea cuttings?
The best time to take hydrangea cuttings is during the summer months, typically from late June to early August, when the plants are actively growing. This ensures that the cuttings are taken from healthy, new growth, which increases the chances of successful rooting.
How long should the cuttings be for propagation in water?
Hydrangea cuttings should be around 4 to 6 inches long and should include at least two or three leaves. This length allows for a good amount of stalk to absorb water while still providing enough foliage for photosynthesis as the cutting develops roots.
Do I need to use rooting hormone when propagating in water?
Using rooting hormone is not strictly necessary when propagating hydrangeas in water, but it can increase the chances of successful rooting. Applying rooting hormone to the cut end of the cutting can help stimulate root development more quickly, although many gardeners have success without it.
See also:
How will I know when my hydrangea cuttings have rooted?
You will know your hydrangea cuttings have rooted when you see new growth on the top or when you gently tug on the cutting and feel resistance. Typically, this rooting process takes about 2 to 4 weeks in water, and you'll want to wait until robust roots have formed before transplanting them into soil.

If you want to read more articles like The Ultimate Guide on How to Grow Hydrangeas from Cuttings in Water: Step-by-Step Tips for Success, we recommend you check out our Shrubs category.
Leave a Reply
Related Articles