How to Build a Raised Garden Bed with Sleepers: Step-by-Step Guide and Tips

Building a raised garden bed with sleepers is an excellent way to create a thriving gardening space while adding visual appeal to your yard. This step-by-step guide will take you through the process, ensuring you have all the necessary tools and materials at your disposal. Raised garden beds not only improve drainage but also make gardening easier on your back and knees. Whether you're a novice gardener or an experienced green thumb, this project can be tailored to suit your needs. Follow our tips and advice to create a sturdy and attractive raised garden bed that will enhance your outdoor space for years to come.
Building a Raised Garden Bed with Sleepers
Constructing a raised garden bed using sleepers is an excellent way to enhance your gardening experience while providing a controlled environment for your plants. Sleepers, often made from treated timber or recycled materials, serve as durable and visually appealing boundaries for your garden bed. They help retain moisture, improve drainage, and create an organized look in your garden space. By elevating the soil level, raised beds can facilitate easier access for planting and maintenance, reduce weed growth, and enable you to cultivate a wider variety of plants without the constraints of traditional gardening.
Advantages of Raised Garden Beds
Raised garden beds offer numerous advantages that can significantly improve your gardening experience. One of the primary benefits is enhanced drainage, as the soil is elevated and less likely to become waterlogged. Moreover, the soil temperature in raised beds tends to warm up faster in the spring, allowing for earlier planting. Gardeners also find that these beds are easier on the back and knees, promoting a more comfortable gardening posture. Additionally, raised beds can improve your garden's overall aesthetic, providing a neat and organized look that can complement your landscape.
Choosing the Right Sleepers
Selecting the appropriate sleepers is crucial for the longevity and safety of your raised garden bed. Common options include hardwood, softwood, and composite sleepers. Hardwood provides durability and resistance to rot, making it an excellent choice for long-lasting structures. Softwood, while more affordable, may require frequent replacement unless treated with preservatives. Composite materials can offer a low-maintenance alternative, combining the look of wood with the longevity of plastic. It’s essential to check for any potentially harmful chemicals in treated woods to ensure they are safe for growing edible plants.
Building Your Raised Garden Bed
Constructing your own raised garden bed with sleepers involves several straightforward steps. Begin by choosing a suitable location that receives adequate sunlight and is easily accessible. Next, create a rectangular or square shape by laying out the sleepers and securing them together with corner brackets or screws. After confirming the dimensions, remove any grass or weeds from the area, then fill the bed with a mix of high-quality topsoil and compost to provide your plants with optimal nutrients. Water the soil thoroughly and allow it to settle before planting your seedlings or seeds.
See also: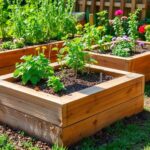
Maintenance Tips for Your Raised Garden Bed
Maintaining a raised garden bed is essential for ensuring healthy plant growth. Regularly check for signs of pests and diseases, promptly removing any affected plants to prevent spreading. Mulching around your plants can help retain moisture, suppress weeds, and regulate soil temperature. It's also important to water your garden bed consistently, especially during dry periods, and amend the soil annually with fresh compost to replenish nutrients. Moreover, rotating your crops each season can help prevent soil depletion and reduce the risk of disease.
Popular Plants for Raised Garden Beds
When considering what to grow in your raised garden bed, opt for plants that thrive in controlled conditions. Popular choices include tomatoes, lettuce, carrots, and herbs like basil and parsley. These plants thrive in the enriched soil and benefit from the excellent drainage provided by the raised structure. Additionally, you can experiment with vertical gardening techniques by incorporating trellises for vine plants, allowing you to maximize space and create an attractive display in your garden.
| Feature | Raised Garden Beds | In-Ground Gardens |
|---|---|---|
| Drainage | Excellent | Variable |
| Soil Temperature | Warms quickly | Slower warming |
| Accessibility | Easier on back | Bending required |
| Weed Control | Reduced | More prevalent |
| Customization | Highly customizable | Less flexibility |
Choosing the Right Sleepers for Your Garden Bed
When building a raised garden bed, it is essential to select the right sleepers to ensure durability and safety for your plants. Timber sleepers, made from treated wood, are popular due to their longevity and ability to withstand the elements. However, it’s crucial to choose chemically-treated lumber that’s safe for growing food, or opt for naturally rot-resistant woods like cedar or redwood. Additionally, consider the dimensions of the sleepers—thicker ones provide better structure, while longer lengths allow for larger garden beds. Be aware of local regulations regarding timber use in gardens and consider the overall aesthetic you want to achieve in your outdoor space.
Gathering the Necessary Tools and Materials
To start building your raised garden bed, gather all necessary tools and materials beforehand. You will need a saw, drill, measuring tape, level, and stakes for marking your layout. Additionally, have screws or bolts ready to secure the sleepers together. For the bed itself, you will need at least four sleepers, depending on the size you plan to create. Having landscape fabric or cardboard can also help with weed control in the bottom of the bed. Preparing all these items in advance will streamline your process and reduce delays.
Preparing the Site for Your Raised Bed
Before constructing your raised garden bed, it’s vital to properly prepare the site. Choose a location that receives adequate sunlight, ideally at least six to eight hours a day. Remove any grass, weeds, or debris from the chosen area to ensure a clean foundation. You may want to use a level tool to ensure the ground is even, as this promotes proper drainage and helps avoid water pooling. If needed, you can dig down a few inches to create a flat and stable base for your sleepers, which will set your garden bed up for success.
See also:
Assembling the Sleepers for Stability
When it's time to assemble the sleepers, begin by laying out your first corner and securing it with screws. It’s recommended to use long screws that will penetrate the wood for more stability. Utilize a level to check that each sleeper is even as you build the sides of the bed. You can create a rectangular or square shape, depending on your design preferences. Interlocking corners can also provide additional strength. Make sure to check alignment frequently, as this will save time and ensure a robust structure that can withstand the weight of the soil and plants.
Filling Your Raised Bed with Soil
Once your raised bed structure is complete, it's time to fill it with soil. A good mixture for planting combines topsoil, compost, and organic matter to ensure proper drainage and nutrient availability for your plants. The ratio often suggested is about one-third compost to two-thirds soil. This blend not only supports healthy plant growth but also helps retain moisture without becoming waterlogged. Fill the bed up to the top, leaving a few inches to account for settling, and level the surface to create an even planting area.
Planting and Maintaining Your Raised Garden Bed
After filling your raised garden bed, you can begin planting your chosen crops or flowers. Consider the planting season and the types of plants that thrive in your climate and the amount of sunlight your bed receives. Post-planting, regular maintenance is crucial, including proper watering, mulching to suppress weeds, and monitoring for pests. Raised beds generally require less effort to manage than traditional rows in the ground, making them a great option for home gardeners. Regular care and attention will yield a bountiful harvest and contribute to a vibrant garden.
Questions from Our Readers
What are the benefits of using sleepers for a raised garden bed?
Using sleepers for a raised garden bed offers several advantages. They are durable, able to withstand weather changes, and provide excellent support for a variety of plants. Additionally, wooden sleepers can enhance the aesthetic appeal of your garden, while also helping to define the planting area and maintain soil integrity.
How do I properly install sleepers for a raised garden bed?
To properly install sleepers for a raised garden bed, first design the layout and determine the dimensions. Then, lay the sleepers in the desired shape, ensuring that they are level and securely placed. You can connect the corners with screws or brackets for added stability, and then fill the bed with quality soil and compost to create the ideal planting environment.
See also:
Are treated sleepers safe for growing vegetables?
Treated sleepers may contain chemicals that can leach into the soil and affect plant growth. It is generally recommended to use untreated or naturally rot-resistant woods, such as cedar or redwood, when building a raised garden bed for growing vegetables to ensure safety and health for both plants and consumers.
How deep should a raised garden bed with sleepers be?
A raised garden bed with sleepers should ideally be at least 12 to 18 inches deep to provide sufficient soil for root development. This depth is appropriate for most vegetables and flowers, allowing them ample space to grow while facilitating proper drainage and aeration in the soil.

If you want to read more articles like How to Build a Raised Garden Bed with Sleepers: Step-by-Step Guide and Tips, we recommend you check out our Planter category.
Leave a Reply
Related Articles